DW Faisalabad New Version

DW Faisalabad New Version
Please Jump to New Version
Showing posts with label Userform. Show all posts

Friday, 14 July 2017

Interactive Userform

Below we will look at a program in Excel VBA that creates an interactive Userform. The Userform we are going to create looks as follows:


Explanation: whenever you enter a value in the ID text box, Excel VBA loads the corresponding record. When you click the Edit / Add button, Excel VBA edits the record on the sheet or adds the record when the ID does not yet exist. The Clear button clears all the text boxes. The Close button closes the Userform.

To create this Userform, execute the following steps.

1. Open the Visual Basic Editor. If the Project Explorer is not visible, click View, Project Explorer.

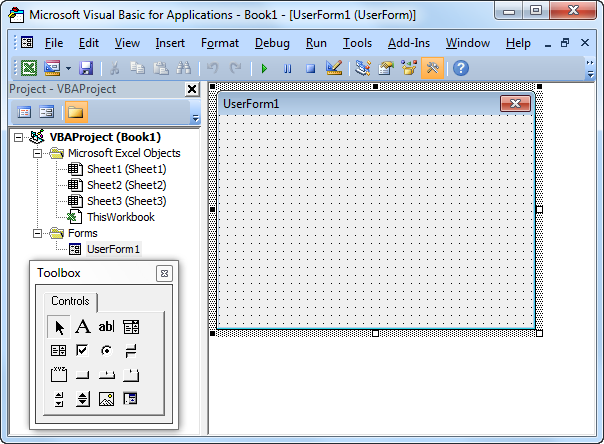
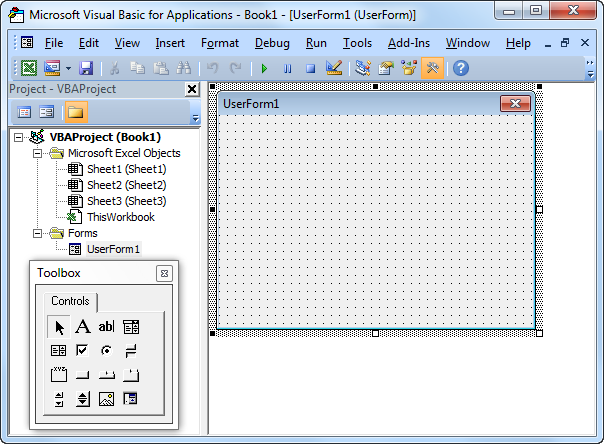
2. Click Insert, Userform. If the Toolbox does not appear automatically, click View, Toolbox. Your screen should be set up as below.


3. Add the labels, text boxes (first at the top, the second below the first, and so on) and command buttons. Once this has been completed, the result should be consistent with the picture of the Userform shown earlier. For example, create a text box control by clicking on TextBox from the Toolbox. Next, you can drag a text box on the Userform.

4. You can change the names and the captions of the controls. Names are used in the Excel VBA code. Captions are those that appear on your screen. It is good practice to change the names of the controls, but it is not necessary here because we only have a few controls in this example. To change the caption of the labels, text boxes and command buttons, click View, Properties Window and click on each control.

5. To show the Userform, place a command button on your worksheet and add the following code line:

Private Sub CommandButton1_Click()

UserForm1.Show

End Sub
We are now going to create the Sub UserForm_Initialize. When you use the Show method for the Userform, this sub will automatically be executed.

6. Open the Visual Basic Editor.

7. In the Project Explorer, right click on UserForm1 and then click View Code.

8. Choose Userform from the left drop-down list. Choose Initialize from the right drop-down list.

9. Add the following code line:

Private Sub UserForm_Initialize()

TextBox1.SetFocus

End Sub
Explanation: this code line sets the focus on the first text box as this is where we want to start when the Userform is loaded.

We have now created the first part of the Userform. Although it looks neat already, nothing will happen yet when we enter a value in the ID text box or when we click one of the command buttons.

10. In the Project Explorer, right click on UserForm1 and then click View Code.

11. Choose TextBox1 from the left drop-down list. Choose Change from the right drop-down list.

12. Add the following code line:

Private Sub TextBox1_Change()

GetData

End Sub
13. In the Project Explorer, double click on UserForm1.

14. Double click on the Edit / Add command button.

15. Add the following code line:

Private Sub CommandButton1_Click()

EditAdd

End Sub
16. Double click on the Clear command button.

17. Add the following code line:

Private Sub CommandButton2_Click()

ClearForm

End Sub
Explanation: these subs call other subs we are going to create in a second.

18. Double click on the Close command button.

19. Add the following code line:

Private Sub CommandButton3_Click()

Unload Me

End Sub
Explanation: this code line closes the Userform.

Time to create the subs. You can go through our Function and Sub chapter to learn more about subs. If you are in a hurry, simply place the following subs into a module (In the Visual Basic Editor, click Insert, Module).

20. First, declare three variables of type Integer and one variable of type Boolean. Declare the variables in the General Declarations section (at the top of the module). This way you only have to declare the variables once and you can use them in multiple subs.

Dim id As Integer, i As Integer, j As Integer, flag As Boolean
21. Add the GetData sub.

Sub GetData()

If IsNumeric(UserForm1.TextBox1.Value) Then
    flag = False
    i = 0
    id = UserForm1.TextBox1.Value

    Do While Cells(i + 1, 1).Value <> ""

        If Cells(i + 1, 1).Value = id Then
            flag = True
            For j = 2 To 3
                UserForm1.Controls("TextBox" & j).Value = Cells(i + 1, j).Value
            Next j
        End If

        i = i + 1

    Loop

    If flag = False Then
        For j = 2 To 3
            UserForm1.Controls("TextBox" & j).Value = ""
        Next j
    End If
Else
    ClearForm
End If

End Sub
Explanation: If the ID text box contains a numeric value, Excel VBA searches for the ID and loads the corresponding record. We use the Controls Collection to easily loop through text boxes. If Excel VBA cannot find the ID (flag is still False), it empties the second and third text box. If the ID text box does not contain a numeric value, Excel VBA calls the ClearForm sub.

22. Add the ClearForm sub.

Sub ClearForm()

For j = 1 To 3
    UserForm1.Controls("TextBox" & j).Value = ""
Next j

End Sub
Explanation: Excel VBA clears all the text boxes.

23. Add the EditAdd sub.

Sub EditAdd()

Dim emptyRow As Long

If UserForm1.TextBox1.Value <> "" Then
    flag = False
    i = 0
    id = UserForm1.TextBox1.Value
    emptyRow = WorksheetFunction.CountA(Range("A:A")) + 1

    Do While Cells(i + 1, 1).Value <> ""

        If Cells(i + 1, 1).Value = id Then
            flag = True
            For j = 2 To 3
                Cells(i + 1, j).Value = UserForm1.Controls("TextBox" & j).Value
            Next j
        End If

        i = i + 1

    Loop

    If flag = False Then
        For j = 1 To 3
            Cells(emptyRow, j).Value = UserForm1.Controls("TextBox" & j).Value
        Next j
    End If

End If

End Sub
Explanation: If the ID text box is not empty, Excel VBA edits the record on the sheet (the opposite of loading a record as we have seen earlier). If Excel VBA cannot find the ID (flag is still False), it adds the record to the next empty row. The variable emptyRow is the first empty row and increases every time a record is added.

24. Exit the Visual Basic Editor, enter the labels shown below into row 1 and test the Userform.

.
Read More »

Userform with Multiple Pages

Below we will look at a program in Excel VBA which creates a Userform that contains multiple pages. This userform also contains images.

The Multipage Control contains two pages. At page 1, the user can fill in his/her personal information. At page 2, the user can indicate which painting he/she likes the most.


To create this Userform, execute the following steps.

1. Open the Visual Basic Editor. If the Project Explorer is not visible, click View, Project Explorer.

2. Click Insert, Userform. If the Toolbox does not appear automatically, click View, Toolbox. Your screen should be set up as below.


3. Add the Multipage control, labels, text boxes (first at the top, the second below the first), frame, option buttons (first at the left, the second at the right), list box, Image control and command button. Once this has been completed, the result should be consistent with the empty version of the Userform shown earlier. For example, create a Multipage control by clicking on Multipage from the Toolbox. Next, you can drag a Multipage control on the Userform. When you arrive at the Gender frame, remember to draw this frame first before you place the two option buttons in it.

4. You can change the names and the captions of the controls. Names are used in the Excel VBA code. Captions are those that appear on your screen. It is good practice to change the names of the controls, but it is not necessary here because we only have a few controls in this example. To change the caption of the Userform, Multipage tabs, labels, frame, option buttons and command button, click View, Properties Window and click on each control.

5. To show the Userform, place a command button on your worksheet and add the following code line:

Private Sub CommandButton1_Click()

UserForm1.Show

End Sub
We are now going to create the Sub UserForm_Initialize. When you use the Show method for the Userform, this sub will automatically be executed.

6. Open the Visual Basic Editor.

7. In the Project Explorer, right click on UserForm1 and then click View Code.

8. Choose Userform from the left drop-down list. Choose Initialize from the right drop-down list.

9. Add the following code lines:

Private Sub UserForm_Initialize()

With ListBox1
    .AddItem "Mountains"
    .AddItem "Sunset"
    .AddItem "Beach"
    .AddItem "Winter"
End With

End Sub
Explanation: the list box on page 2 will be filled.

We have now created the first part of the Userform. Although it looks neat already, nothing will happen yet when we select an item from the list box or when we click on the OK button.

10. Download the images (right side of this page) and add them to "C:\test\"

11. In the Project Explorer, double click on UserForm1.

12. Double click on the list box.

13. Add the following code lines:

Private Sub ListBox1_Click()

If ListBox1.ListIndex = 0 Then
    Image1.Picture = LoadPicture("C:\test\Mountains.jpg")
End If

If ListBox1.ListIndex = 1 Then
    Image1.Picture = LoadPicture("C:\test\Sunset.jpg")
End If

If ListBox1.ListIndex = 2 Then
    Image1.Picture = LoadPicture("C:\test\Beach.jpg")
End If

If ListBox1.ListIndex = 3 Then
    Image1.Picture = LoadPicture("C:\test\Winter.jpg")
End If

End Sub
Explanation: these code lines load a picture depending on the selected item in the list box.

14. Double click on the OK button.

15. Add the following code lines:

Private Sub CommandButton1_Click()

Dim emptyRow As Long

'Make Sheet1 active
Sheet1.Activate

'Determine emptyRow
emptyRow = WorksheetFunction.CountA(Range("A:A")) + 1

'Transfer information
Cells(emptyRow, 1).Value = TextBox1.Value
Cells(emptyRow, 2).Value = TextBox2.Value

If OptionButton1.Value = True Then
    Cells(emptyRow, 3).Value = "Male"
Else
    Cells(emptyRow, 3).Value = "Female"
End If

Cells(emptyRow, 4).Value = ListBox1.Value

'Close Userform
Unload Me

End Sub
Explanation: first, we activate Sheet1. Next, we determine emptyRow. The variable emptyRow is the first empty row and increases every time a record is added. Next, we transfer the information from the Userform to the specific columns of emptyRow. Finally, we close the Userform.

16. Exit the Visual Basic Editor, enter the labels shown below into row 1 and test the Userform.

Result:

.
Read More »

Controls Collection

When creating Userforms in Excel VBA, you can use the Controls collection to easily loop through controls and set a property of each control to a specific value.

The Userform we are going to create looks as follows:


To create this Userform, execute the following steps:

1. Open the Visual Basic Editor. If the Project Explorer is not visible, click View, Project Explorer.

2. Click Insert, Userform. If the Toolbox does not appear automatically, click View, Toolbox. Your screen should be set up as below.


3. Add the label, text boxes (first at the top, the second below the first, and so on) and command button. Once this has been completed, the result should be consistent with the picture of the Userform shown earlier. For example, create a text box control by clicking on TextBox from the Toolbox. Next, you can drag a text box on the Userform.

4. To change the caption of the Userform, label and command button, click View, Properties Window and click on each control.

5. To show the Userform, place a command button on your worksheet and add the following code line:

Private Sub CommandButton1_Click()

UserForm1.Show vbModeless

End Sub
Explanation: by adding vbModeless, you can use the Userform and work in your worksheet at the same time.

We have now created the first part of the Userform. Although it looks neat already, nothing will happen yet when we click the command button on the Userform.

6. Open the Visual Basic Editor.

7. In the Project Explorer, double click on UserForm1.

8. Double click on the command button.

9. Add the following code lines:

Private Sub CommandButton1_Click()

Dim i As Integer

For i = 1 To 10
    Controls("TextBox" & i).Value = Cells(i + 1, 1).Value
Next i

End Sub
Explanation: With just a few lines of code, we can fill the text boxes with the phone numbers from the sheet. We used the & operator to concatenate (join) the elements. These code lines work because we didn't change the names of the text box controls (TextBox1, TextBox2, TextBox3, etc). To change the names of the controls, click View, Properties Window and click on each control.

Result when you click the command button on the sheet:

.
Read More »

Loop through Controls

With just a few lines of code, we can easily loop through controls on an Excel VBA Userform. The Userform we are going to create looks as follows:


To create this Userform, execute the following steps.

1. Open the Visual Basic Editor. If the Project Explorer is not visible, click View, Project Explorer.

2. Click Insert, Userform. If the Toolbox does not appear automatically, click View, Toolbox. Your screen should be set up as below.


3. Add the label, check boxes (first at the top, the second below the first, and so on) and command button. Once this has been completed, the result should be consistent with the picture of the Userform shown earlier. For example, create a check box control by clicking on CheckBox from the Toolbox. Next, you can drag a check box on the Userform.

4. You can change the names and the captions of the controls. Names are used in the Excel VBA code. Captions are those that appear on your screen. It is good practice to change the names of the controls, but it is not necessary here because we only have a few controls in this example. To change the caption of the Userform, label, check boxes and command button, click View, Properties Window and click on each control.

5. To show the Userform, place a command button on your worksheet and add the following code line:

Private Sub CommandButton1_Click()

UserForm1.Show

End Sub
We have now created the first part of the Userform. Although it looks neat already, nothing will happen yet when we click on the Clear button.

6. Open the Visual Basic Editor.

7. In the Project Explorer, double click on UserForm1.

8. Double click on the Clear button.

9. Add the following code lines:

Private Sub CommandButton1_Click()

Dim contr As control

For Each contr In UserForm1.Controls
    If TypeName(contr) = "CheckBox" Then
        contr.Value = False
    End If
Next

End Sub
Explanation: Excel VBA loops through all controls on the Userform. The TypeName function is used to filter out the check box controls. If a check box control, Excel VBA unchecks the check box. contr is randomly chosen here, you can use any name. Remember to refer to this name in the rest of your code.

Result when you click the Clear button:

.
Read More »

Multicolumn Combo Box

Below we will look at a program in Excel VBA which creates a Userform that contains a multicolumn combo box.

The Userform we are going to create looks as follows:


To create this Userform, execute the following steps.

1. Open the Visual Basic Editor. If the Project Explorer is not visible, click View, Project Explorer.

2. Click Insert, Userform. If the Toolbox does not appear automatically, click View, Toolbox. Your screen should be set up as below.


3. Add the label, combo box and command buttons. Once this has been completed, the result should be consistent with the picture of the Userform shown earlier. For example, create a combo box control by clicking on ComboBox from the Toolbox. Next, you can drag a combo box on the Userform.

4. You can change the names and the captions of the controls. Names are used in the Excel VBA code. Captions are those that appear on your screen. It is good practice to change the names of the controls, but it is not necessary here because we only have a few controls in this example. To change the caption of the Userform, label and command buttons, click View, Properties Window and click on each control.

5. To show the Userform, place a command button on your worksheet and add the following code line:

Private Sub CommandButton1_Click()

UserForm1.Show

End Sub
We are now going to create the Sub UserForm_Initialize. When you use the Show method for the Userform, this sub will automatically be executed.

6. Open the Visual Basic Editor.

7. In the Project Explorer, right click on UserForm1 and then click View Code.

8. Choose Userform from the left drop-down list. Choose Initialize from the right drop-down list.

9. Add the following code lines:

Private Sub UserForm_Initialize()

ComboBox1.ColumnCount = 2

Dim Films(1 To 5, 1 To 2) As String
Dim i As Integer, j As Integer

Films(1, 1) = "Lord of the Rings"
Films(2, 1) = "Speed"
Films(3, 1) = "Star Wars"
Films(4, 1) = "The Godfather"
Films(5, 1) = "Pulp Fiction"

Films(1, 2) = "Adventure"
Films(2, 2) = "Action"
Films(3, 2) = "Sci-Fi"
Films(4, 2) = "Crime"
Films(5, 2) = "Drama"

ComboBox1.List = Films

End Sub
Explanation: The first code line sets the number of columns of the combo box to 2. Instead of setting the number of columns at runtime, you can also configure this setting at design time. To achieve this, right mouse click on the combo box control, click Properties and set the ColumnCount property to 2. Next, we declare and initialize a two-dimensional array. The last code line assigns the array to the combo box.

We have now created the first part of the Userform. Although it looks neat already, nothing will happen yet when we click the command buttons on the Userform.

10. In the Project Explorer, double click on UserForm1.

11. Double click on the OK button.

12. Add the following code lines:

Private Sub CommandButton1_Click()

Unload Me

MsgBox "You selected " & ComboBox1.Value

On Error Resume Next
MsgBox "You like " & ComboBox1.Column(1) & " movies"

End Sub
Note: these code lines close the Excel VBA Userform and display the selected item and genre. The 'On Error Resume Next' statement ignores the error when the user fills in his/her own movie (in this case there is no genre available).

13. Double click on the Cancel button.

14. Add the following code line:

Private Sub CommandButton2_Click()

Unload Me

End Sub
Result when you select Speed and click OK.


.
Read More »

Multiple List Box Selections

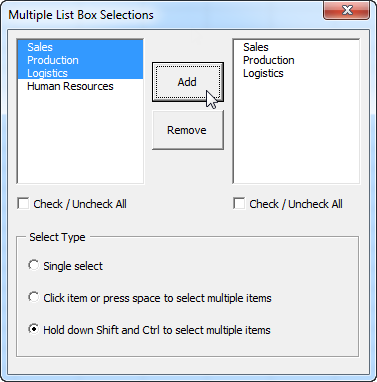
The MultiSelect property in Excel VBA allows a user to select multiple items in a list box. The Userform we are going to create looks as follows:


To create this Userform, execute the following steps.

1. Open the Visual Basic Editor. If the Project Explorer is not visible, click View, Project Explorer.

2. Click Insert, Userform. If the Toolbox does not appear automatically, click View, Toolbox. Your screen should be set up as below.


3. Add the list boxes (first at the left, the second at the right), command buttons, check boxes (first at the left, the second at the right), frame and option buttons (first at the top, the second below the first, and so on). Once this has been completed, the result should be consistent with the picture of the Userform shown earlier. For example, create a list box control by clicking on ListBox from the Toolbox. Next, you can drag a list box on the Userform. When you arrive at the 'Select Type' frame, remember to draw this frame first before you place the three option buttons in it.

4. You can change the names and the captions of the controls. Names are used in the Excel VBA code. Captions are those that appear on your screen. It is good practice to change the names of the controls, but it is not necessary here because we only have a few controls in this example. To change the caption of the Userform, command buttons, check boxes, frame and option buttons, click View, Properties Window and click on each control.

5. To show the Userform, place a command button on your worksheet and add the following code line:

Private Sub CommandButton1_Click()

UserForm1.Show

End Sub
We are now going to create the Sub UserForm_Initialize. When you use the Show method for the Userform, this sub will automatically be executed.

6. Open the Visual Basic Editor.

7. In the Project Explorer, right click on UserForm1 and then click View Code.

8. First, declare the variable i of type Integer. Declare the variable in the General Declarations section (at the top of the code). This way you only have to declare the variable once and you can use them in multiple subs.

Dim i As Integer
9. Choose Userform from the left drop-down list. Choose Initialize from the right drop-down list.

10. Add the following code lines:

Private Sub UserForm_Initialize()

With ListBox1
    .AddItem "Sales"
    .AddItem "Production"
    .AddItem "Logistics"
    .AddItem "Human Resources"
End With

OptionButton3.Value = True

End Sub
Explanation: the first list box will be filled and the third option button is set as default.

We have now created the first part of the Userform. Although it looks neat already, nothing will happen yet when we click the command buttons or the other controls.

11. In the Project Explorer, double click on UserForm1.

12. Double click on the Add button.

13. Add the following code lines:

Private Sub CommandButton1_Click()

For i = 0 To ListBox1.ListCount - 1
    If ListBox1.Selected(i) = True Then ListBox2.AddItem ListBox1.List(i)
Next i

End Sub
Explanation: Excel VBA loops through the first list box (list index number of zero (0) for the first item in the list) and, if selected, adds the item to the second list box.

14. Double click on the Remove button.

15. Add the following code lines:

Private Sub CommandButton2_Click()

Dim counter As Integer
counter = 0

For i = 0 To ListBox2.ListCount - 1
    If ListBox2.Selected(i - counter) Then
        ListBox2.RemoveItem (i - counter)
        counter = counter + 1
    End If
Next i

CheckBox2.Value = False

End Sub
Explanation: Excel VBA loops through the second list box and, if selected, removes the item. The counter variable holds track of the number of removed items.

16. Double click on the first option button.

17. Add the following code lines:

Private Sub OptionButton1_Click()

ListBox1.MultiSelect = 0
ListBox2.MultiSelect = 0

End Sub
18. Double click on the second option button.

19. Add the following code lines:

Private Sub OptionButton2_Click()

ListBox1.MultiSelect = 1
ListBox2.MultiSelect = 1

End Sub
20. Double click on the third option button.

21. Add the following code lines:

Private Sub OptionButton3_Click()

ListBox1.MultiSelect = 2
ListBox2.MultiSelect = 2

End Sub
Explanation: the 'Select Type' setting can be chosen by clicking on the option buttons. The picture of the Userform shown earlier gives a description of each setting. Instead of configuring this setting at runtime, you can also configure this setting at design time. To achieve this, right mouse click on a list box control, and then click on Properties. Set the MultiSelect property to 0 - fmMultiSelectSingle, 1 - fmMultiSelectMulti or 2 - fmMultiSelectExtented.

22. Double click on the first check box.

23. Add the following code lines:

Private Sub CheckBox1_Click()

If CheckBox1.Value = True Then
    For i = 0 To ListBox1.ListCount - 1
        ListBox1.Selected(i) = True
    Next i
End If

If CheckBox1.Value = False Then
    For i = 0 To ListBox1.ListCount - 1
        ListBox1.Selected(i) = False
    Next i
End If

End Sub
Explanation: by checking the first check box, all the items of the first list box can be selected / deselected.

24. Double click on the second check box to add the same code lines. Only replace CheckBox1 with CheckBox2 and ListBox1 with ListBox2..
Read More »

Progress Indicator

Below we will look at a program in Excel VBA that creates a progress indicator. We've kept the progress indicator as simple as possible, yet it looks professional. Are you ready?

The Userform we are going to create looks as follows:


To create this Userform, execute the following steps.

1. Open the Visual Basic Editor. If the Project Explorer is not visible, click View, Project Explorer.

2. Click Insert, Userform. If the Toolbox does not appear automatically, click View, Toolbox. Your screen should be set up as below.


This Userform only consists of three controls. A frame control and two label controls.

3. Add the frame control. You can do this by clicking on Frame from the Toolbox. Next, you can drag a frame control on the Userform. You need to change some properties of this frame control. Right mouse click on the frame control, and then click on Properties. Empty the Caption field, set the Height to 24 and Width to 204.

4. Add the first label control and place it in the Frame control. Right mouse click on the label control, and then click on Properties. Change the name to Bar, BackColor to Highlight, empty the Caption field, set the Height to 20 and Width to 10.

5. Add the second label control and place it above the Frame control. Right mouse click on the label control, and then click on Properties. Change the name to Text and change the Caption to '0% Completed'.

6. Change the caption of the Userform to Progress Indicator.

Once this has been completed, the result should be consistent with the picture of the Userform shown earlier.

7. Place a command button on your worksheet and add the following code line to show the Userform:

Private Sub CommandButton1_Click()

UserForm1.Show

End Sub
If you have gone through the other Userform examples on this site, you know that this is the time to create the Sub UserForm_Initialize. This Sub runs automatically whenever the Userform is loaded. Thus, when you use the Show method for the Userform, the code will automatically be executed. Instead of the Sub UserForm_Initialize, we create the Sub UserForm_Activate. By using this sub, Excel VBA can update the Userform to show the progress of the macro.

8. Open the Visual Basic Editor.

9. In the Project Explorer, right click on UserForm1 and then click View Code.

10. Choose Userform from the left drop-down list. Choose Activate from the right drop-down list.

11. Add the following code line:

Private Sub UserForm_Activate()

code

End Sub
Explanation: this sub calls another sub named code we are going to create in a minute. Confused? You can go through our Function and Sub chapter to learn more about subs. If you are in a hurry, just execute the following steps and you will be fine.

12. Place the sub named code into a module (In the Visual Basic Editor, click Insert, Module). This is just an example. This is THE place to add your own code when you want to use this progress indicator for your own macro. The code looks as follows.

Sub code()

Dim i As Integer, j As Integer, pctCompl As Single

Sheet1.Cells.Clear

For i = 1 To 100
    For j = 1 To 1000
        Cells(i, 1).Value = j
    Next j
    pctCompl = i
    progress pctCompl
Next i

End Sub
Explanation: first, we initialize some variables. Next, we clear sheet1. We use a double loop to show the values from 1 to 1000 in the first 100 rows of the worksheet. This will keep Excel VBA busy for a while and gives us the opportunity to see the progress of the macro. The variable pctCompl (abbreviation for percentageCompleted) measures the progress of the macro. Finally, we call another sub named progress and pass the value of the variable pctCompl to update the Userform. This way we can see the progress of the macro!

13. Add another sub named progress. The code looks as follows:

Sub progress(pctCompl As Single)

UserForm1.Text.Caption = pctCompl & "% Completed"
UserForm1.Bar.Width = pctCompl * 2

DoEvents

End Sub
Explanation: the first code line changes the caption of the first label control. The second code line changes the width of the second label control. Add DoEvents to update the Userform.

14. Exit the Visual Basic Editor and click the command button on the sheet:

Result:


Note: for this macro, we used the variable i to measure the progress. For example, at row 11, 10% is completed. This may be different for your macro. The technique of passing the value of the variable pctCompl to the sub progress to update the Userform remains the same..
Read More »

Currency Converter

Below we will look at a program in Excel VBA which creates a Userform that converts any amount from one currency into another.

The Userform we are going to create looks as follows:


To create this Userform, execute the following steps.

1. Open the Visual Basic Editor. If the Project Explorer is not visible, click View, Project Explorer.

2. Click Insert, Userform. If the Toolbox does not appear automatically, click View, Toolbox. Your screen should be set up as below.


3. Add the labels, list boxes (first at the left, the second at the right), text boxes (first at the left, the second at the right) and command button. Once this has been completed, the result should be consistent with the picture of the Userform shown earlier. For example, create a list box control by clicking on ListBox from the Toolbox. Next, you can drag a list box on the Userform.

4. You can change the names and the captions of the controls. Names are used in the Excel VBA code. Captions are those that appear on your screen. It is good practice to change the names of the controls, but it is not necessary here because we only have a few controls in this example. To change the caption of the Userform, command button and labels, click View, Properties Window and click on each control.

5. To show the Userform, place a command button on your worksheet and add the following code line:

Private Sub CommandButton1_Click()

UserForm1.Show

End Sub
We are now going to create the Sub UserForm_Initialize. When you use the Show method for the Userform, this sub will automatically be executed.

6. Open the Visual Basic Editor.

7. In the Project Explorer, right click on UserForm1 and then click View Code.

8. Choose Userform from the left drop-down list. Choose Initialize from the right drop-down list.

9. Add the following code lines:

Private Sub UserForm_Initialize()

With ListBox1
    .AddItem "Euro"
    .AddItem "Us Dollar"
    .AddItem "British Pound"
End W
ith
With ListBox2
    .AddItem "Euro"
    .AddItem "Us Dollar"
    .AddItem "British Pound"
End With

ListBox1.ListIndex = 1
ListBox2.ListIndex = 0

TextBox1.Value = 1
TextBox2.Value = 0.722152

End Sub
Explanation: first, the two list boxes are filled. Next, The US Dollar currency is set as default in the first list box and the EURO currency is set as default in the second list box. Finally, the value 1 is entered in the first text box and the value 0.722152 is entered in the second text box.

We have now created the first part of the Userform. Although it looks neat already, nothing will happen yet when we click on the Go button.

10. In the Project Explorer, double click on UserForm1.

11. Double click on the Go button.

12. Add the following code lines:

Private Sub CommandButton1_Click()

Dim rates(0 To 2, 0 To 2) As Double, i As Integer, j As Integer

rates(0, 0) = 1
rates(0, 1) = 1.38475
rates(0, 2) = 0.87452

rates(1, 0) = 0.722152
rates(1, 1) = 1
rates(1, 2) = 0.63161

rates(2, 0) = 1.143484
rates(2, 1) = 1.583255
rates(2, 2) = 1

For i = 0 To 2
    For j = 0 To 2
        If ListBox1.ListIndex = i And ListBox2.ListIndex = j Then TextBox2.Value = TextBox1.Value * rates(i, j)
    Next j
Next i

End Sub
Explanation: first, we declare an array. The array has two dimensions. It consists of 3 rows and 3 columns. Next, we initialize each element of the array. For example, rates(1,0) is the currency rate from US Dollar to EURO. Next, we start a double loop. Depending on the selected currencies in the list boxes, Excel VBA converts the amount entered in the first text box and displays the result in the second text box.

Example: if i = 2 and j = 1 and we enter the value 2 in the first text box, Excel VBA places the value 2 * rates(2,1) = 2 * 1.583255 = 3.16651 in the second text box.

13. Test the Userform.

Result:

.
Read More »

Userform and Ranges

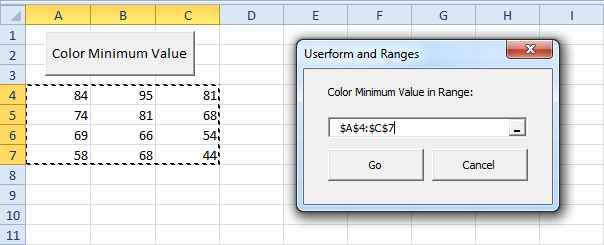
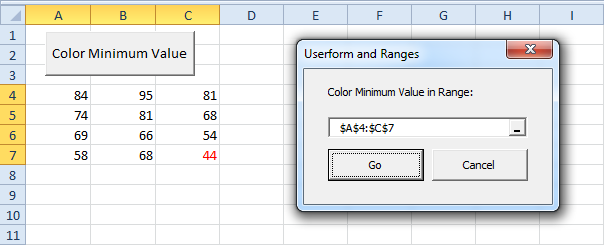
You can use a RefEdit control in Excel VBA to get a range from a user. The Userform we are going to create colors the minimum value of the range stored in the RefEdit control.


To create this Userform, execute the following steps.

1. Open the Visual Basic Editor. If the Project Explorer is not visible, click View, Project Explorer.

2. Click Insert, Userform. If the Toolbox does not appear automatically, click View, Toolbox. Your screen should be set up as below.


3. Add the label, RefEdit control and command buttons. Once this has been completed, the result should be consistent with the picture of the Userform shown earlier. For example, create a RefEdit control by clicking on RefEdit from the Toolbox. Next, you can drag a RefEdit control on the Userform.

Note: If your toolbox does not have a RefEdit control, set a reference to RefEdit control. Click Tools, References, and check Ref Edit Control.

4. You can change the names and the captions of the controls. Names are used in the Excel VBA code. Captions are those that appear on your screen. It is good practice to change the names of the controls, but it is not necessary here because we only have a few controls in this example. To change the caption of the Userform, label and command buttons, click View, Properties Window and click on each control.

5. To show the Userform, place a command button on your worksheet and add the following code line:

Private Sub CommandButton1_Click()

UserForm1.Show

End Sub
We are now going to create the Sub UserForm_Initialize. When you use the Show method for the Userform, this sub will automatically be executed.

6. Open the Visual Basic Editor.

7. In the Project Explorer, right click on UserForm1 and then click View Code.

8. Choose Userform from the left drop-down list. Choose Initialize from the right drop-down list.

9. Add the following code lines:

Private Sub UserForm_Initialize()

Sheet1.Cells.Font.Color = vbBlack
UserForm1.RefEdit1.Text = Selection.Address

End Sub
Explanation: the first code line changes the font color of all the cells on sheet1 to black. The second code line obtains the address of the current selection and displays it in the RefEdit control.

We have now created the first part of the Userform. Although it looks neat already, nothing will happen yet when we click the command buttons on the Userform.

10. In the Project Explorer, double click on UserForm1.

11. Double click on the Go button.

12. Add the following code lines:

Private Sub CommandButton1_Click()

Dim addr As String, rng, cell As Range, minimum As Double

addr = RefEdit1.Value
Set rng = Range(addr)
minimum = WorksheetFunction.Min(rng)

For Each cell In rng
    If cell.Value = minimum Then cell.Font.Color = vbRed
Next cell

End Sub
Explanation: first, we get the address from the RefEdit control and store it into the String variable addr. Next, we set rng to the range specified in the RefEdit control. Next, we use the worksheet function Min to find the minimum value in the range. Finally, we color the minimum value(s) using a loop.

13. Double click on the Cancel button.

14. Add the following code line:
Private Sub CommandButton2_Click()

Unload Me

End Sub
Explanation: this code line closes the Userform when you click on the Cancel button.

15. Test the Userform.

Result:

.
Read More »

Userform

Add the Controls  |  Show the Userform  |  Assign the Macros  |  Test the Userform

This chapter teaches you how to create an Excel VBA Userform. The Userform we are going to create looks as follows:


Add the Controls

To add the controls to the Userform, execute the following steps.

1. Open the Visual Basic Editor. If the Project Explorer is not visible, click View, Project Explorer.

2. Click Insert, Userform. If the Toolbox does not appear automatically, click View, Toolbox. Your screen should be set up as below.


3. Add the controls listed in the table below. Once this has been completed, the result should be consistent with the picture of the Userform shown earlier. For example, create a text box control by clicking on TextBox from the Toolbox. Next, you can drag a text box on the Userform. When you arrive at the Car frame, remember to draw this frame first before you place the two option buttons in it.

4. Change the names and captions of the controls according to the table below. Names are used in the Excel VBA code. Captions are those that appear on your screen. It is good practice to change the names of controls. This will make your code easier to read. To change the names and captions of the controls, click View, Properties Window and click on each control.


Note: a combo box is a drop-down list from where a user can select an item or fill in his/her own choice. Only one of the option buttons can be selected.

Show the Userform

To show the Userform, place a command button on your worksheet and add the following code line:

Private Sub CommandButton1_Click()

DinnerPlannerUserForm.Show

End Sub
We are now going to create the Sub UserForm_Initialize. When you use the Show method for the Userform, this sub will automatically be executed.

1. Open the Visual Basic Editor.

2. In the Project Explorer, right click on DinnerPlannerUserForm and then click View Code.

3. Choose Userform from the left drop-down list. Choose Initialize from the right drop-down list.

4. Add the following code lines:

Private Sub UserForm_Initialize()

'Empty NameTextBox
NameTextBox.Value = ""

'Empty PhoneTextBox
PhoneTextBox.Value = ""

'Empty CityListBox
CityListBox.Clear

'Fill CityListBox
With CityListBox
    .AddItem "San Francisco"
    .AddItem "Oakland"
    .AddItem "Richmond"
End With

'Empty DinnerComboBox
DinnerComboBox.Clear

'Fill DinnerComboBox
With DinnerComboBox
    .AddItem "Italian"
    .AddItem "Chinese"
    .AddItem "Frites and Meat"
End With

'Uncheck DataCheckBoxes
DateCheckBox1.Value = False
DateCheckBox2.Value = False
DateCheckBox3.Value = False

'Set no car as default
CarOptionButton2.Value = True

'Empty MoneyTextBox
MoneyTextBox.Value = ""

'Set Focus on NameTextBox
NameTextBox.SetFocus

End Sub
Explanation: text boxes are emptied, list boxes and combo boxes are filled, check boxes are unchecked, etc.

Assign the Macros

We have now created the first part of the Userform. Although it looks neat already, nothing will happen yet when we click the command buttons on the Userform.

1. Open the Visual Basic Editor.

2. In the Project Explorer, double click on DinnerPlannerUserForm.

3. Double click on the Money spin button.

4. Add the following code line:

Private Sub MoneySpinButton_Change()

MoneyTextBox.Text = MoneySpinButton.Value

End Sub
Explanation: this code line updates the text box when you use the spin button.

5. Double click on the OK button.

6. Add the following code lines:

Private Sub OKButton_Click()


Dim emptyRow As Long

'Make Sheet1 active
Sheet1.Activate

'Determine emptyRow
emptyRow = WorksheetFunction.CountA(Range("A:A")) + 1

'Transfer information
Cells(emptyRow, 1).Value = NameTextBox.Value
Cells(emptyRow, 2).Value = PhoneTextBox.Value
Cells(emptyRow, 3).Value = CityListBox.Value
Cells(emptyRow, 4).Value = DinnerComboBox.Value

If DateCheckBox1.Value = True Then Cells(emptyRow, 5).Value = DateCheckBox1.Caption

If DateCheckBox2.Value = True Then Cells(emptyRow, 5).Value = Cells(emptyRow, 5).Value & " " & DateCheckBox2.Caption

If DateCheckBox3.Value = True Then Cells(emptyRow, 5).Value = Cells(emptyRow, 5).Value & " " & DateCheckBox3.Caption

If CarOptionButton1.Value = True Then
    Cells(emptyRow, 6).Value = "Yes"
Else
    Cells(emptyRow, 6).Value = "No"
End If

Cells(emptyRow, 7).Value = MoneyTextBox.Value

End Sub
Explanation: first, we activate Sheet1. Next, we determine emptyRow. The variable emptyRow is the first empty row and increases every time a record is added. Finally, we transfer the information from the Userform to the specific columns of emptyRow.

7. Double click on the Clear button.

8. Add the following code line:

Private Sub ClearButton_Click()

Call UserForm_Initialize

End Sub
Explanation: this code line calls the Sub UserForm_Initialize when you click on the Clear button.

9. Double click on the Cancel Button.

10. Add the following code line:

Private Sub CancelButton_Click()

Unload Me

End Sub
Explanation: this code line closes the Userform when you click on the Cancel button.

Test the Userform

Exit the Visual Basic Editor, enter the labels shown below into row 1 and test the Userform.

Result:

.
Read More »