DW Faisalabad New Version

DW Faisalabad New Version
Please Jump to New Version
Showing posts with label MS Word. Show all posts

Monday, 15 May 2017

What is View Button?

View buttons may refer to any of the following:

1. In Microsoft Office programs such as Excel, PowerPoint, and Word, the view buttons are a feature that lets you change how the presentation or document appears. In the picture is an example of how the view buttons appear in Excel, PowerPoint, and Word in the bottom right corner of the program.


For example, in Microsoft Excel, you have the option of changing the views to Normal, Page Layout, and Page Break Preview. In Microsoft PowerPoint, you have the option of changing between Normal, Slide Sorter, Reading View, and Slide Show. Finally, in Microsoft Word, you have the options of Print Layout, Full Screen Reading, Web Layout, Outline, and Draft views.

Below is an overview of a Microsoft Word window with an example of where the view buttons are located.


Available views

Draft - In Microsoft Word the Draft view gives you a draft view of a document.

Full Screen Reading - In Microsoft Word the Full Screen Reading allows you to view (not edit) a document in full screen without any of the toolbars. Tip: To exit Full Screen Reading press the escape key.

Normal view - The Normal view is the default view of the program.

Outline - Gives you and Outline view.

Page break view - In Microsoft Excel the Page Break Preview shows your spreadsheet and where each page ends and begins with a blue dotted line. Tip: If you need more space for each of your pages adjust the margins.

Page Layout - With Microsoft Excel the Page Layout gives you an overview of how each of the pages in your spreadsheet will appear including the header and footer. See our page layout definition for further information.

Print Layout - The Print Layout gives you an overview of how your document appears when printed. Tip: Use the Print Layout to make sure your document prints properly before printing to save you paper.

Reading view - In the Reading view you get a full window view of each of the slides in PowerPoint and a better example of how your presentation will appear.

Slide Show view - The Slide Show view shows a full screen view of your PowerPoint presentation and is the view you can use to show your presentation.

Slide Sorter - In the Slide Sorter view you get an overview of all slides in PowerPoint. In this view you can also organize your slides by dragging a slide to a different position.

Web Layout - In Microsoft Word the Web Layout shows your document in a full-screen with all the toolbars and the ability to edit.

2. In Windows Explorer, the views button or View is a feature that allows you to change how the folders and files are shown. In Windows XP, the Views button was a button that gave you some of the options available below. With Windows Vista and 7 some of the below options were available on the View menu. Finally, in Windows 8 and later versions all view options were available under the View tab.


Available views in the views button

Since the introduction of the Views button in Windows, there have been many revisions to the available views Windows Explorer can show. Below are all options that have been available and a brief description about each of the options.

Content - Introduced with Windows Vista, the Content view shows details about the content of the file. For example, with images it shows you the dimensions.

Details - Available with all versions of Windows the Details view shows you details about the file such as the date modified, type of file, and size of the file.

Extra large icons - Introduced with Windows Vista, the Extra large icons view is the biggest preview of files and is great for seeing a preview of images.

Filmstrip - Used in Windows XP and earlier to get a preview of images.

Icons - Used in Windows XP and earlier to show files and folders as icons.

List - Available with all versions of Windows to only show file names with no additional details.

Medium icons - Introduced with Windows Vista, the Extra large icons view is a medium preview of files and is great for seeing a preview of several images at a time.

Small icons - Introduced with Windows Vista, the Small large icons view is a small preview of files and is good for getting a quick overview of pictures.

Thumbnails - Used in Windows XP and earlier to show thumbnails of each of the files. Good for viewing images.

.
Read More »

Saturday, 17 December 2016

Save the Office Document as PDF

Applies To: Excel 2016 Word 2016 PowerPoint 2016 OneNote 2016 Publisher 2016

Save your documents according to your need that works best for you. here come how to save you Office or word file as PDF format


Follow the following steps for do this.


  • Go to File
  • Click Save As
  • Select the designation where you want to save you file.
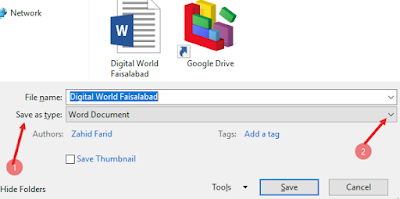
  • Save as Window will appear and now go to Save as type (as show below Arrow 1) click on drop down menu (as show below Arrow 2) and change the file to to PDF File format.

  • Click Save
Now you have successfully save your document in PDF

Save as PDF, Way 2

  1. Go to File
  2. Click Export
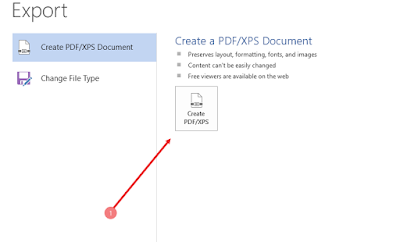
  3. Click PDF/XPS Document feature (as show below)


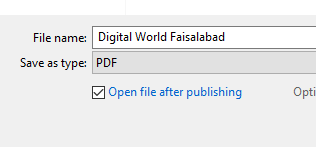
  • Select the designation. you can see the file type is already in PDF mode (as show below)

  • Click Publish

Now you have successfully save your document in PDF

Watch All these step in Video


.
Read More »

Monday, 12 December 2016

AutoCorrect Text

What is AutoCorrect Text
Unlike the Autotext Gallery, you complete a word, phrase or sentence in paragraph by typing just a few characters or abbreviations.

For example you are writing a paragraph, a phrase Digital World Faisalabad comes agains and again and you are feeling annoyed by entering it again and again because of its length, you want to add "Digital World Faisalabad" in seconds by adding a few characters like DWF or any other abbreviation. To do this, you first need to add the text entries of DWF and Digital World Faisalabad in the AutoCorrect data.

An other example; you are composing a question papers and you know that you will have to enter "Describe the following questions" phrase again and again while writing every question. So how to enter this phrase in just 3 or 4 words. 

Follow these steps:
  • First add the text entry in AutoCorrect Text
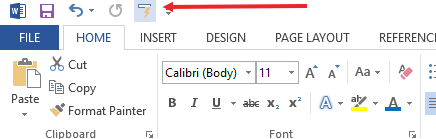
  • Click the AutoText Option from Quick Access Toolbar (See Below)


  • If you will not find this option there the follow these steps to show this icon in Quick access toolbar
    • Go to File Tab
    • Click Option
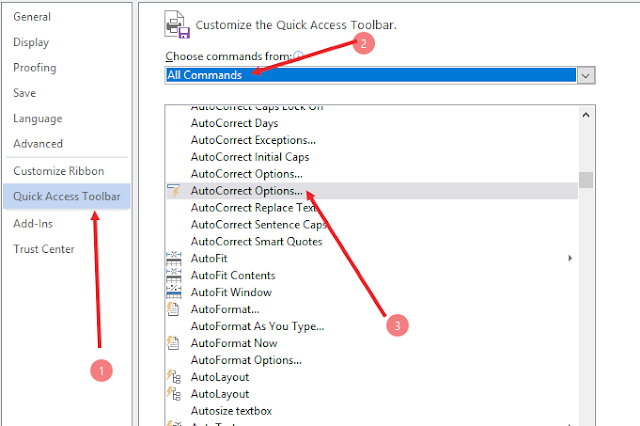
    • Click on Quick Access Toolbar on left side (See Below Arrow No. 1)
    • Now select All Commands  (See Below Arrow No. 2)
    • From the selection box Find AutoCorrect Option... with small icom (See Below Arrow No. 3)


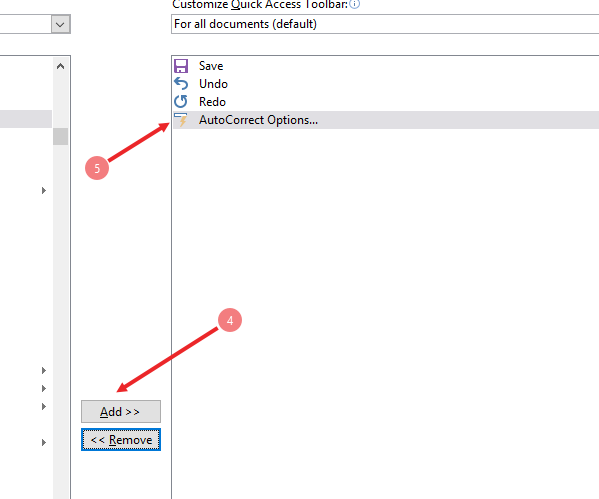
    • After Selecting, click the add button (See Below Arrow No. 4)
    • You will find this option in toolbar box (See Below Arrow No. 5)
    • Click OK


  • Now you will face AutoCorrect Button in Toolbar. Click on it.
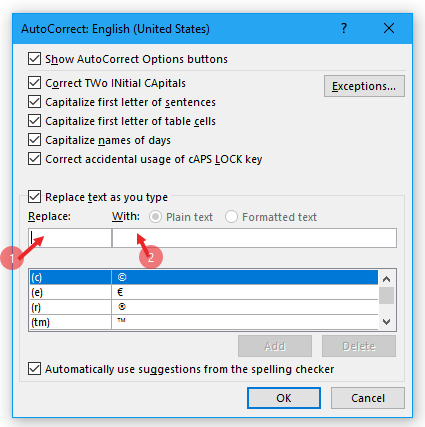
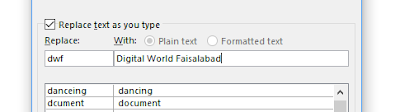
  • A new window will open, In Replace text field, Type the abbreviation of phrase DWF (In case of taking above example) and write the complete phrase Digital World Faisalabad in replace with text field (See Below Arrow No. 1 and 2 respectively)


  • Click Add and then click OK.
You have successfully added entry in AutoText List. Now go the MS word and type dwf and press enter. dwf will automatically be replaced with Digital World Faisalabad.

So You can do play with it m,ore and more by adding more entries in AutoCorrect list.

How to delete AutoCorrect Entry from List


  • Go to AutoCorret Option
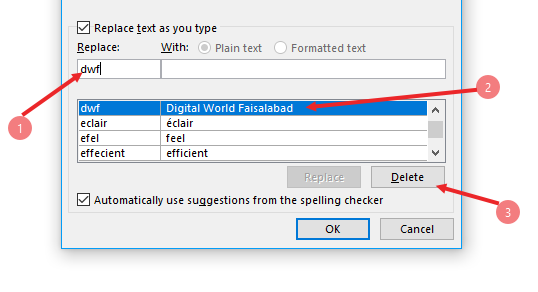
  • Find the entry that you want to delete by typing abbreviations in replace box.
  • You saved entry will appear below, select that and click the Delete Button to delete the entry.
  • Click Ok

How to Add Formatted Text in AutoCorrect List
follow these steps

  • Open MS Word and type you phrase, word or sentence
  • Format it according to your needs
  • Select the Formatted text 
  • and click on Auto correct option
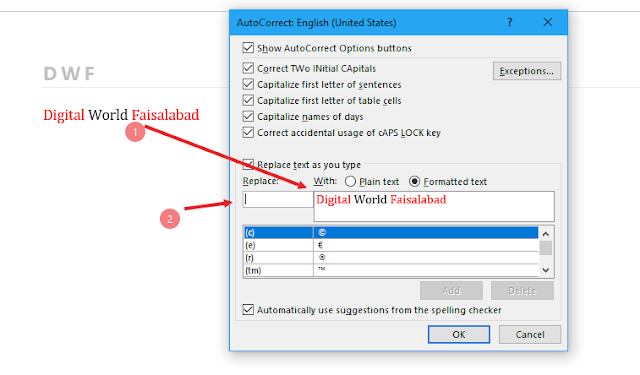
  • the Selected formated text will be show Replace With field (as show below arrow 1)

  • Now add short words or abbreviations in replace text field (as shown below Arrow two)
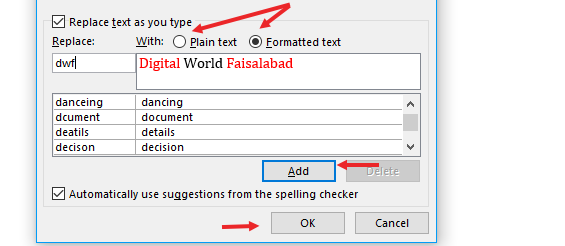
  • if you can not add in formatted shape then click on plaint text radio button. (as shown below)
  • Click add 
  • Click OK


You have successfully added Formatted entry in AutoText List. Now go the MS word and type dwf and press enter. dwf will automatically be replaced with formatted phrase (Digital World Faisalabad)

If You want to play with it more in depth then,

  • Go to File tab
  • Then jump to Option
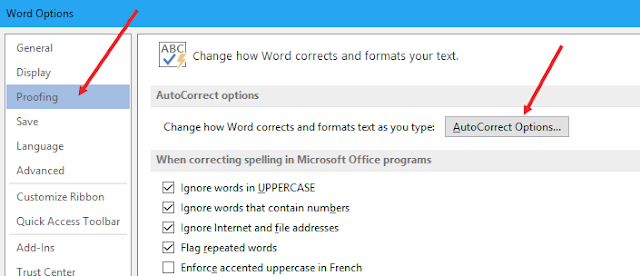
  • Click Proofing on left side (See below)
  • Click autoCorrect Option (See below)


  • A new windows will appear have many tabs like 
    • AutoCorrect
    • Math AutoCorrect
    • Autoformat as you type
    • AutoFormat
    • Action


Watch All above working in Video


Learn more about AutoText Gallery

.

Read More »

AutoText Gallery

You can insert text automatically using AutoText from your AutoText gallery but first you need to add text in this gallery. This is the most useful feature in auto insertion category.

When you need to enter the same text again and again and the text contains a lot of formatting, like colour, size bold, italic, having picture tables etc. You need to create AutoText entries by adding text to the AutoText gallery step by step. 

How to add Text to auto Text Gallery
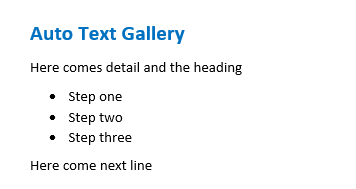
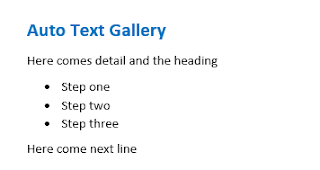
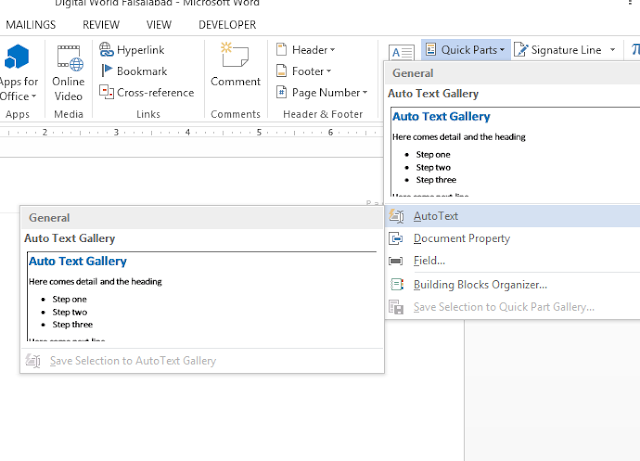
Let's Take an example, you want to enter the following text again and again after some paragraphs or in every page and it annoys you to again and again format the heading, changing colour to blue and inserting the bullets (See below). 


First we add this formatted text to AutoText Gallery by follow these steps

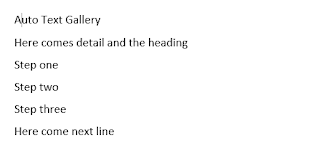
  • Write the text that you want to insert again and again.  (See Below) 
  • Format it according to your requirement.  (See Below) 
  • After that select the whole text that you want to add.
  • Go to INSERT tab.
  • Go to Text group.
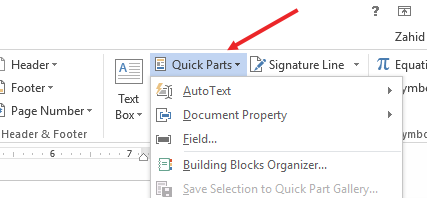
  • Click on Quick Parts.
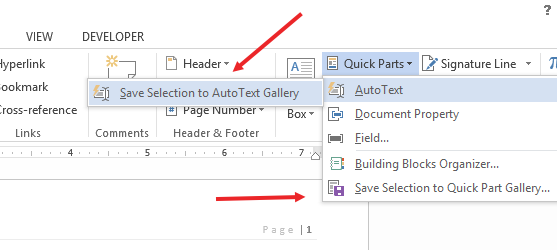
  • Go to Auto Text

  • and click Save Selection to Auto Text Gallery.this option located at two place  (See Below) 

  • A pop up window will appear. (See Below) where you need to add 
    • Name of the saved item (As you like), 
    • Gallery of the text normally autoText or Quick part
    • Category normally General
    • Description contains anything that you like to add about saved text (optional)
    • Save in Normal or building blocks (No need to go in depth)
    • Option: Insert content only
      • Select Insert content in its own page to place the building block on a separate page, set off from the rest of your content with page breaks.
      • Select Insert content in its own paragraph to make the content into its own paragraph, even if the user's cursor is in the middle of a paragraph.
      • Select Insert content only for all other content.
    • Click OK


Now You formated text has been saved effectively to gallery

How to Use this saved Text

Now the time has come to insert this formatted text in your documents by just clicking, you don't need to type and format it again and again, just follow these steps.
  1. Go to Insert tab
  2. Go to text Group
  3. Go to Auto Text
  4. Now you will see the same formatted text that you have saved to gallery. Just click on it and you will see the text will have been inserted.

Watch this in Video


Learn about AutoCorrect Text
.
Read More »

Auto Insert Text

Applies To: Word 2016 Word 2013

There are many type to enter the text for auto correction during writing anything, here comes two main type of auto insert text which are more useful and popular for a writer;

  1. AutoText Gallery
  2. AutoCorrect Text
first of all what the the difference between these two.

What is AutoText Gallery

In this type you can insert text using AutoText from your AutoText gallery but first you need to add text in this gallery. This is the most useful feature in auto insertion category, for example, when you need to enter the same again and again and text contains a lot of formatting, like colour, size bold, italic, having picture tables etc. You need to create AutoText entries by adding text to the AutoText gallery step by step.


What is AutoCorrect Text
Unlike the Autotext Gallery, you can also automatically complete a word or phrase or sentence in paragraph by typing just a few characters or abbreviations.

For example you are writing a paragraph and a phrase Digital World Faisalabad comes agains and again and you are feeling annoyed by entering it again and again because of its length, you want to add "Digital World Faisalabad" in seconds by adding a few characters like DWF To do this, you first need to add the text entries of DWF and Digital World Faisalabad in the AutoCorrect data.

An other example is you are composing a question papers and you know that you will have to enter "Describe the following questions" phrase again and again. So how to enter this phrase in just 3 or 4 words. i will tell you later about how to use them.


Now Learn How to use them step by step

.

Read More »

Wednesday, 7 December 2016

Inserting watermark in MS word

Watermark is a picture, logo, text and anything added behind your text on page. companies use this feature to minimize the chances of violation of it copyrighted material. 

You can add MS Word customized and predefined watermarks (Confidential, draft, copy etc)

Lets see how to insert watermark step by step.

Insert Draft, Sample, Do Not Copy or confidential watermark

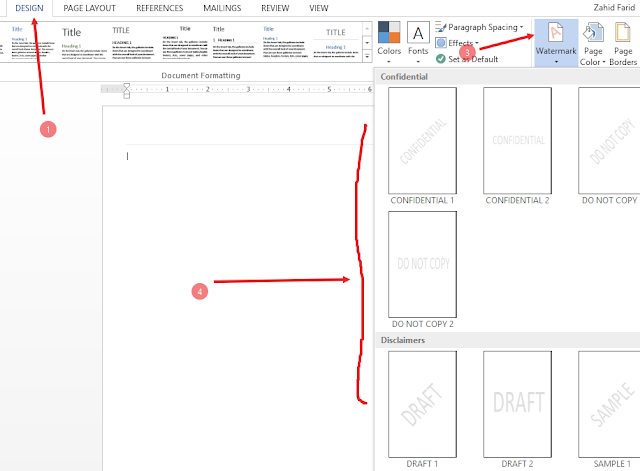
  1. open Word Application and Go to Design tab
  2. In Page background group click on watermark icon
  3. A list of watermarks will appear below, Select your favorite watermarks (Confidential, Don't Copy, Draft and Sample), click on it and you will see watermark on page.
See below


Add Picture watermark

To add a picture or logo, follow these steps.
  • Open Word Application and Go to Design tab
  • In Page background group click on watermark icon
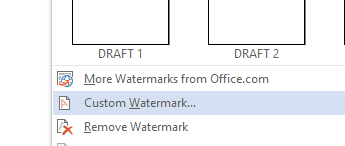
  • A list of watermarks will appear below, at the end of it, you will find Custom Watermark, Click on it

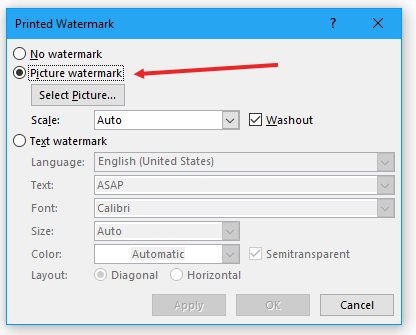
  • After click, you will face a popup window 
  • at the top CHECK the Picture watermark and click the below Select Picture button to add the picture.

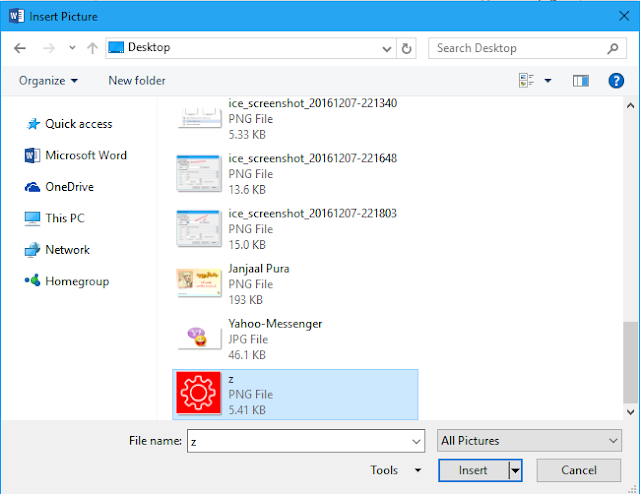
  • New window will open from which you will find your picture or logo. see below
  • select your picture and click Insert. 
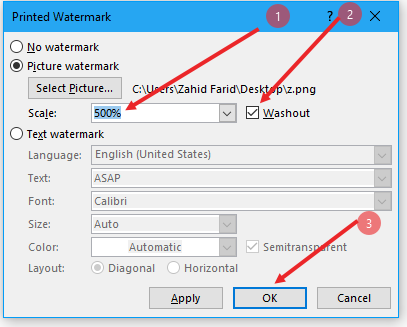
  • Now after selecting, adjust the Scale of picture, mostly people go for 500% from drop down menu (as shown in picture) and check washout option to make watermark dim. see below
  • Click OK 

Add Customized Text watermark

To add your customized Text (i.e. Company name, Abbreviation, any other text etx), follow these steps

  1. Open Word, Go to Design tab
  2. Go to background group and Click on Watermark icon
  3. Click on Custom Watermark at the end of watermark menu box
  4. A news window will appear on which you will find;
    1. No watermark 
    2. Picture watermark, and
    3. Text watermark, Check the TEXT watermark 
  5. As you click this option, all the below features will be immediately active, Select the language.
  6. In Text Field (remove ASAP) write your own text, 
  7. Select your favorite font, size and colour
  8. At the end choose whether you want to display your text horizontally or diagonally.
  9. Then click APPLY and then OK.


You can customize it according to your requirements. Learn how to Delete Watermark

Customize the watermark

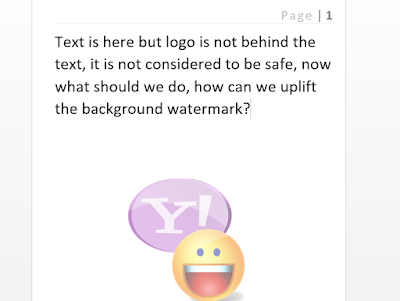
If we have a few lines on paper and our water mark is vertically centered, one can easily remove our logo and use our text or anything else. see the example below 


To uplift the logo, just double click on header or footer area to activate it. when header/footer will be activate, watermark will appear in actual colour or form. click the watermark and drag it to your desired position, you can change the size of the watermark. When done, double click on the empty space on the page to be done.


Watch the Video to learn more


Read More »

How to remove Annoying Watermark in MS Word

Adding Watermark is a nice feature by MS word to insert a washed picture behind your text on word page to decrease the chances of plagiarism or Violation of copyright, but some time this watermark annoys the reader.

Watermarks are text or pictures placed behind the document text. You can add text watermarks, such as Draft or Confidential, to your document. Word provides galleries of ready-made watermarks, or you can create your own custom watermark, such as a company logo.

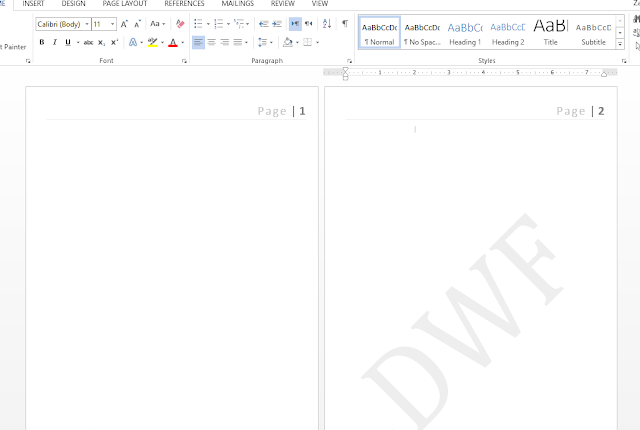
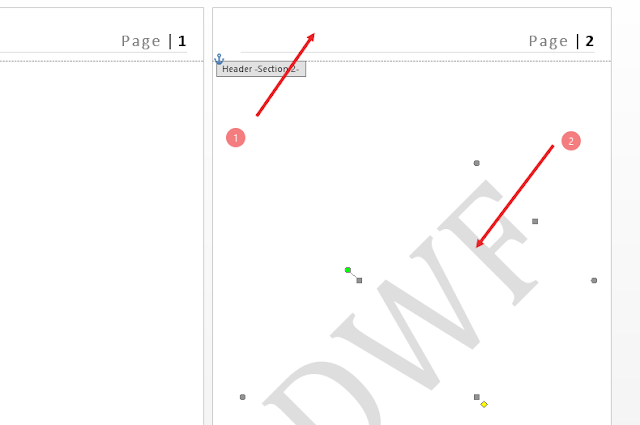
In case of if you have a formatted page with watermark and you want to remove it but it does not to be removed properly, you remove but it still shows on page, mostly second page or last.


In above picture, I have removed Watermark but it still on page 2 and cant be removed by Remove the Watermark button,

Solved

  1. Activate the header or footer by clicking on Header area (or footer area).
  2. When you activate, watermark will appear clearly on your page, click on watermark and it will be selected.
  3. Then press delete button to remove the watermark, it will surely be removed from your page.


Watch every thing in the video below


Read More »

Monday, 5 December 2016

Insert bullets to a list

Bullets and Numbers make the list more attractive, useful and easily understandable for the reader and others. The Bullets command and Numbers command are quite useful and common for text formatting. You can follow the same way to find out both commands in Microsoft Word, PowerPoint, and Publisher

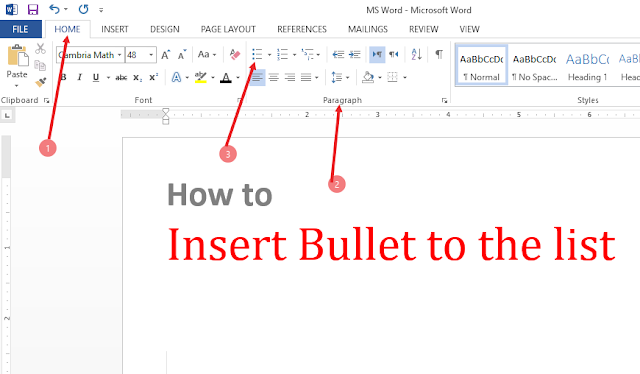
1. Start the list with Bullet Points

follow the steps.
  1. Go to home tab
  2. Go to paragraph box
  3. the click on   button, Bullets will be inserted,
Just start typing the text and press enter to insert another bullet.


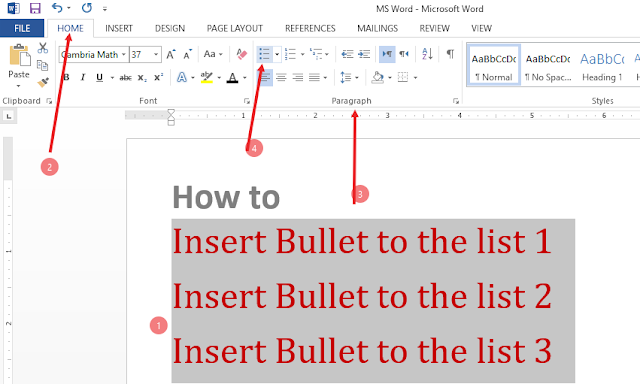
1.1 Insert Bullets after typing

  1. select the list lines to which you want to add bullets
  2. Go to Home tab
  3. Then paragraph 
  4. Click the   button, Bullets will be inserted


1.2 Quickly insert Bullet

Just type * a dn press SPACE button, bullet will be automatically inserted

Quickly insert bullets into Microsoft Word by typing an asterisk (*), a space, and then your sentence. When enter is pressed Microsoft Word will automatically change your asterisks to a bullet and text proceeding that text. Below is an example of how this may look. (www.computerhope.com)

1.3 Insert the more stylish bullet

There are many other icons that you can insert instead of a simple bullet. 
Click the ARROW DOWN  to see different styles of bullets. A complete list will be shown, then select your favorite bullet to insert.

1.4 Insert an image to the bullet

Click the ARROW DOWN  to see different styles of bullets. At the end click on DEFINE NEW BULLET


After selecting you will see a new window having two main Buttons.

First one is the SYMBOL to insert any symbol insert of simple bullet
Second is PICTURE to insert the picture instead of Bullet


Select any image and click OK, Do the same to insert symbols.


1.5 Customize the Bullet

Click on bullet or number, the whole list of bullets or numbers will be selected, then you can change the colour fro, FONT menu as well as you can change the size from Size option in FONT menu.


Read More »

How to Align/Justify the text

Applies To: Word 2016 Word 2013 Word 2010 Word 2007

One of the most common mistakes that people make while formatting a document in Word is to use spaces to align text. Many of us have been frustrated by things not lining up perfectly, and we’re left dissatisfied by the slightly meandering edges.

Microsoft Word 2013 provides multiple ways to align text inside a document. Alignment determines the appearance and orientation of the edges of the paragraph: left-aligned text, right-aligned text, centered text, or justified text, which is aligned evenly along the left and right margins (Microsoft Office Source)

Let suppose. To align the text left

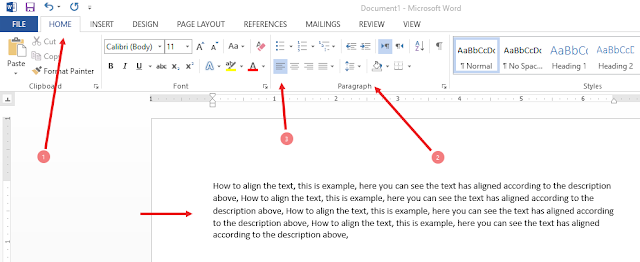
  1. Select the text that you want to align and Click on Home tab
  2. Go to Paragraph box
  3. Click on L Align button
See the picture Below


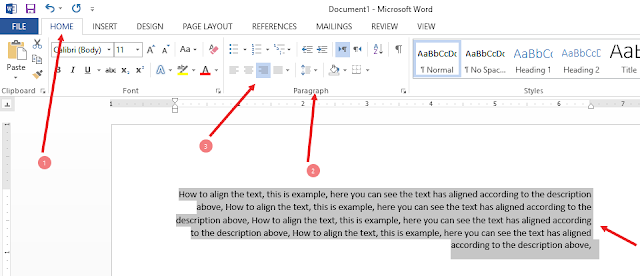
To align the text right

  1. Select the text that you want to align and Click on Home tab
  2. Go to Paragraph box
  3. Click on Right Align button
See the picture Below


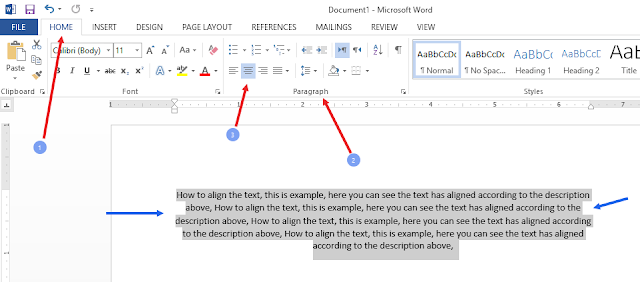
To align the text center

  1. Select the text that you want to align and Click on Home tab
  2. Go to Paragraph box
  3. Click on Center Align button
See the picture Below


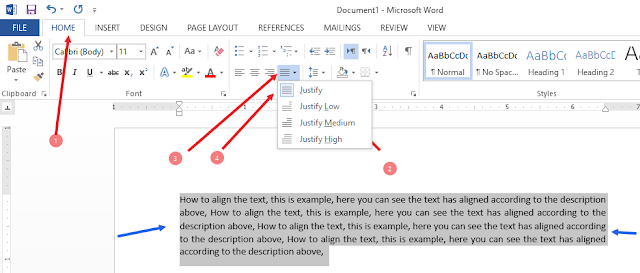
To Justify the text

  1. Select the text that you want to align and Click on Home tab
  2. Go to Paragraph box
  3. Click on justify button, you will see and drop down menu tab the 
  4. click the first one Justify Button
See the picture Below


You can also use Low Justify, Medium Justify and High Justify alignment but I recommend you to not to use these kinds of alignments, it looks the nice in text formation but difficult to read, so just use Simple Justify option


Shortcut key of alignment and justification

  • Align Text to the Left (default) (Ctrl+L)
  • Align Text to the Center (Ctrl+E)
  • Align Text to the Right (Ctrl+R)
  • Fully Justify Text (Ctrl+J)
  • Distribute text between Indents (Ctrl+Shift+J)


Distribute text between Indents align the text effectively but it looks very awkward in text formation.

Watch All above stuff in Video


_____________________________________________


Read More »

Thursday, 1 December 2016

How to customize Font - MS Word

How to customize font in MS Word

Beautiful drafting attracts the people and represents the personality. For those who started to know about MS Word, Font customization is the first step for them.

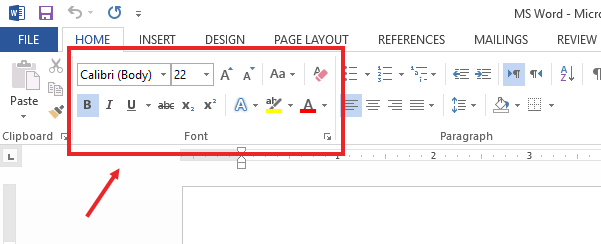
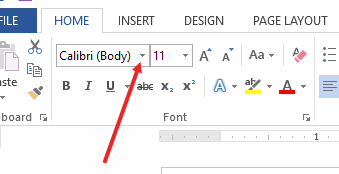
In MS Word 2013, the default selecting Tab is HOME, and below home, you will find FONT box as show below.


In above picture. you can see the word Calibri (Body)d many others, now lets learn one by one, Just open the word file application and type anything, like "Microsoft Word Tool"

Change font style: Select the text of which font you want to change. to select the text, pick the text from one side and drag the mouse to other side. Selected text will be shown as under


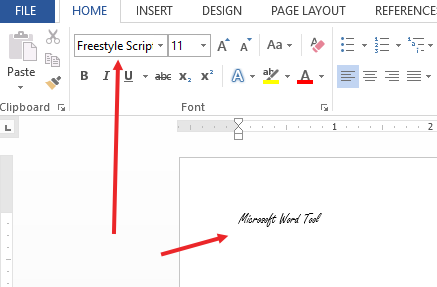
after selecting the text. now to change style click the ARROW DOWN button near font name (Calibri Body), after clicking you will see a list of font style as shown under.


from list click on any test style and see the result


In the following picture you can see the font style has been changed and new font name is appear, see below


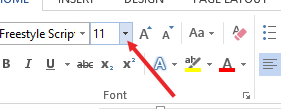
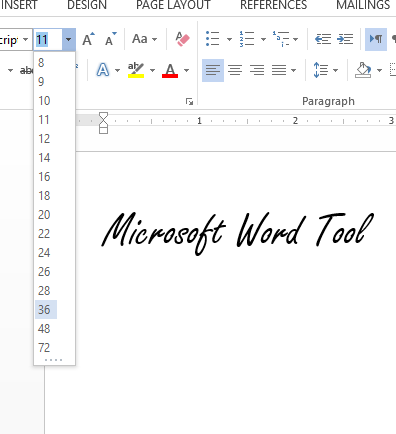
Change Font size:  Now to make this text bigger just select the text, and click the text size ARROW DOWN button. see below


A list will come down and then select the text size number.


if you dont want to use the numbering just select the text and click the Increase Text size and decrease text size button beside Font size arrow down button. see below.

left button of to increase font size and other one is to decrease font size.

How to change case:  Suppose you have typed a complete paragraph but you forgot to insert the first letter of the sentence Capital and you wrote all in small letter. change case will help you, see below to see change case button.


Select the text and click the change case button to make all first letter of sentence capital. after clicking you will see a menu box, select the first Sentence Case Option. Selected text will be changed to normal case (First letter will be capital and rest will be small). Under Sentence case lower case  will lower all the text letters,  Upper Case  will capitalize all the text letters, Capitalize Each Word  will capitalize every first letter of every word and tOGGLE cASE  is the vice versa of Capitalize Each Word.

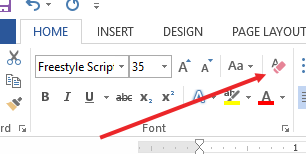
but if you want to clear all this and want to revert to default Font. then click FORMAT button . See below


All the styles, size, and upper lower cases will be removed and text will be in simple case. now see more option inb FONT box


1. Bold: Select text and lick B Button to make BOLD style (Thicker Font) and its short cut key is CTRL + B (Control B)
2. italic: Select text and lick I Button to make italic style (Diagonal style) and  its short cut key is CTRL + I (Control I)
3. Underline:  Select text and lick U Button to insert line under the text (Underline) and  its short cut key is CTRL + U (Control U)
4. Strickthrough:  To draw a line through the text, just click the forth button. (StrikeThrough)
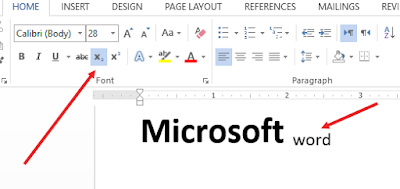
5. Subscript: to type very small text below the text line, we use this sub script button, Select the text that you want to make small and click on subscript button and  its short cut key is CTRL + = (Control =)


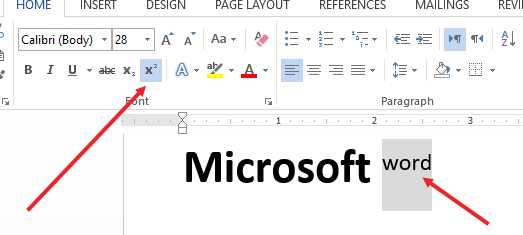
7. Superscript: to type very small text above the text line, we use this superscript button, Select the text that you want to make small and click on superscript button.  and  its short cut key is CTRL + SHIFT + + = (Control + Shift + +)


In the following picture. the last 3 buttons are of;


  1. Text Effect: simple select the text and select any style by clicking  and selecting any style from menu
  2. Background Colour or Highlighter: select the text to highlight and click  Highlight button
  3. Font color: to change the color of text, select the text and click on font color button  and choose your favorite color.

Now watch all above in the video below


Read More »