DW Faisalabad New Version

DW Faisalabad New Version
Please Jump to New Version
Showing posts with label Protect. Show all posts

Monday, 8 May 2017

Mark as Final

Mark a workbook as final in Excel to indicate that this is the final version of your workbook. Only use this feature to discourage editing. Users can still edit the workbook.

1. Open a workbook.

2. On the File tab, click Info.

3. Click Protect Workbook, Mark as Final.


4. Click OK.


Result.


Note: users can still edit the workbook by clicking on Edit Anyway. Also notice the Marked as Final icon in the status bar.
.
Read More »

Read-only Workbook

This example shows you how to make your workbook read-only. Users can still save changes by creating a new copy of the workbook. For a better protection, protect a sheet.

1. Open a workbook.

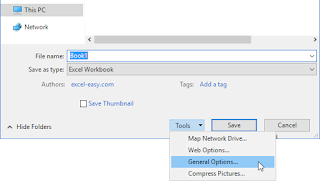
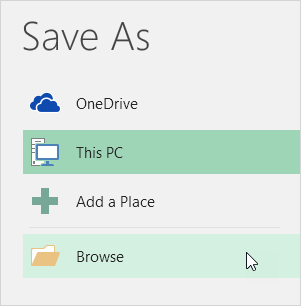
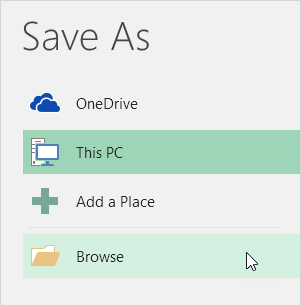
2. On the File tab, click Save As.

3. Click Browse.


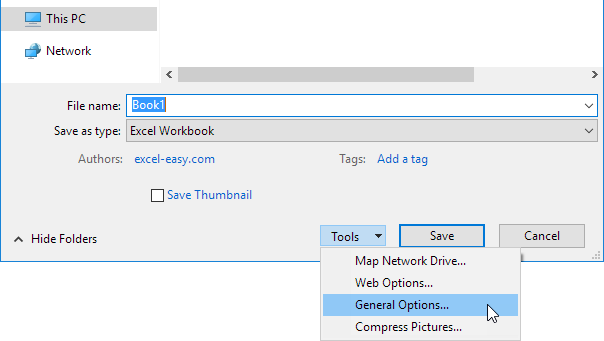
4. Click on the Tools button and click General Options.


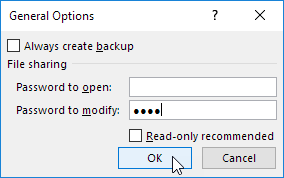
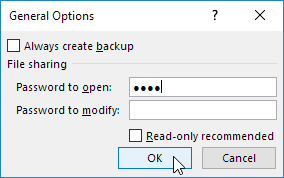
5. In the Password to modify box, enter a password and click OK.


Note: If you only want to recommend users to open the Excel file as read-only, without protecting it, don't enter a password and check Read-only recommended.

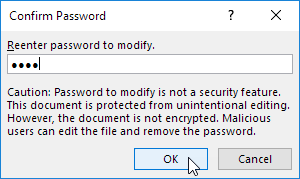
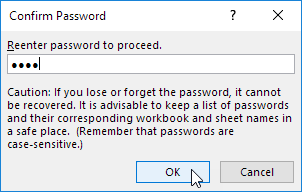
6. Reenter the password and click on OK.


Note: this feature does not encrypt your Excel file. Malicious users can edit the file and remove the password.

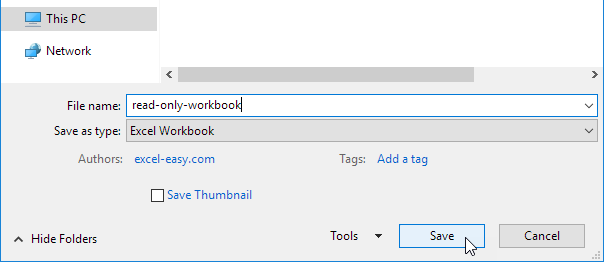
7. Enter a file name and click Save.


Your workbook is read-only now. The password for the downloadable Excel file is "easy".
.
Read More »

Lock Cells

You can lock cells in Excel if you want to protect cells from being edited. In this example, we will lock cell A2.


Before you start: by default, all cells are locked. However, locking cells has no effect until you protect the worksheet. So when you protect a worksheet, all your cells (=worksheet) will be locked. As a result, if you want to lock a cell, you have to unlock all cells first, lock a cell, and then protect the sheet.

1. Select all cells.


2. Right click, and then click Format Cells.

3. On the Protection tab, uncheck the Locked check box and click OK.


4. Right click cell A2, and then click Format Cells.

5. On the Protection tab, check the Locked check box and click OK.


Note: if you also check the Hidden check box, users cannot see the formula in the formula bar when they select cell A2.

6. Protect the sheet.

Cell A2 is locked now. To edit cell A2, you have to unprotect the sheet. The password for the downloadable Excel file is "easy". You can still edit all other cells.
.
Read More »

Protect Sheet

When you share an Excel file with other users, you may want to protect a worksheet to help prevent it from being changed.

1. Right click a worksheet tab.

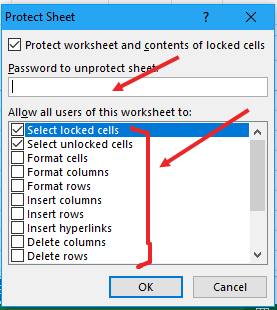
2. Click Protect Sheet.


3. Enter a password.

4. Check the actions you allow the users of your worksheet to perform.

5. Click OK.


Note: if you don't check any action, users can only view the Excel file!

6. Confirm the password and click OK.


Your worksheet is protected now. To unprotect a worksheet, right click on the worksheet tab and click Unprotect Sheet. The password for the downloadable Excel file is "easy".
.
Read More »

Protect Workbook

This example teaches you how to protect the workbook structure in Excel.

If you protect the workbook structure, users cannot insert, delete, rename, move, copy, hide or unhide worksheets anymore.

1. Open a workbook.

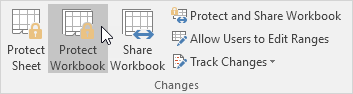
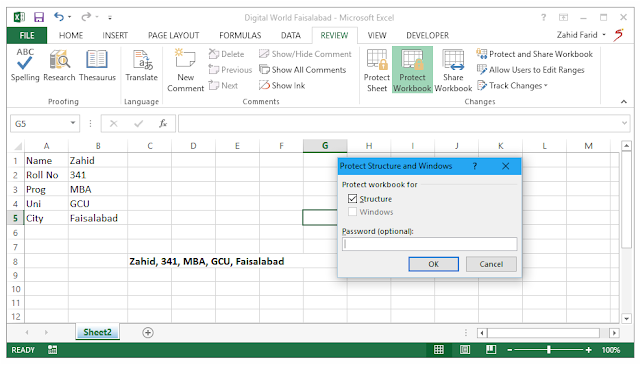
2. On the Review tab, in the Changes group, click Protect Workbook.


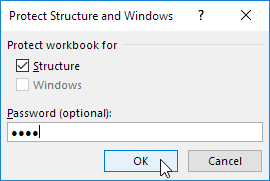
3. Check Structure, enter a password and click OK.


Note: The Windows option is not available in Excel 2013 and later versions.

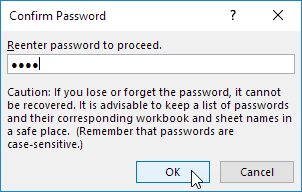
4. Reenter the password and click on OK.


Users cannot insert, delete, rename, move, copy, hide or unhide worksheets anymore.


Note: to unprotect the workbook, click Protect Workbook and enter the password. The password for the downloadable Excel file is "easy".
.
Read More »

Sunday, 7 May 2017

Protect

Encrypt an Excel file with a password so that it requires a password to open it.

1. Open a workbook.

2. On the File tab, click Save As.

3. Click Browse.


4. Click on the Tools button and click General Options.


5. In the Password to open box, enter a password and click OK.


6. Reenter the password and click OK.


Note: this feature also encrypts your Excel file. If you lose or forget the password, it cannot be recovered.

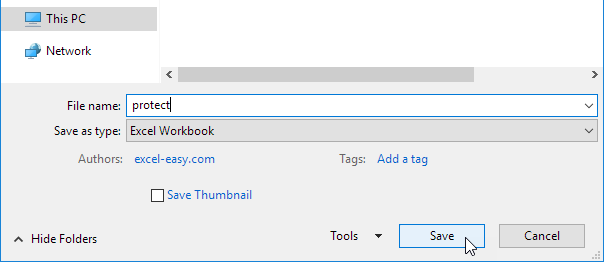
7. Enter a file name and click Save.


It requires a password to open this Excel file now. The password for the downloadable Excel file is "easy".
.
Read More »

Thursday, 26 January 2017

Protect a workbook

First of all you need to know the difference about Protect the worksheet, protect the workbook and protect the file. To know about this, click here.

To prevent others from viewing hidden worksheets, adding, moving, deleting, hiding worksheets, and renaming them, you can protect the structure of your Excel workbook with a smart password.


Protect the workbook structure

Its a few click method to protect the structure of the workbook, follow these steps;
  • Go to Review.
  • Go to Changes Group.
  • Click Protect Workbook button.
  • Enter a password in the Password box.
  • Click OK.
  • Retype the password to confirm it.


Note: Do something strong to store or remember your password, if you lose it once, MS Excel cannot retrieve it.
Read More »

Wednesday, 25 January 2017

Protect Worksheet

Protecting the worksheet restricts the reader to change, edit or move the data in worksheet.

Note: Protecting the worksheet is different feature from Protecting the MS file and Restrict Editing MS Word File.

Protecting the Worksheet in MS Excel is an excellent feature that allow the writer to restrict the reader to change the content of the Excel sheet.

By doing this you can allow user to perform limited action or restrict his/her to to change anything. how to protect sheet, see below.


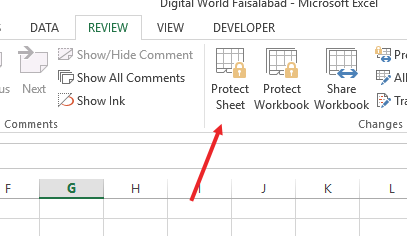
  • Go to Review tab and click Protect sheet. A pop up box will appear.


There is another easy way to go to ALLOW All user of this worksheet to list, that is,

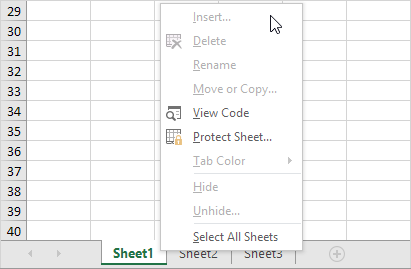
  • Select the sheet from bottom sheet tabs
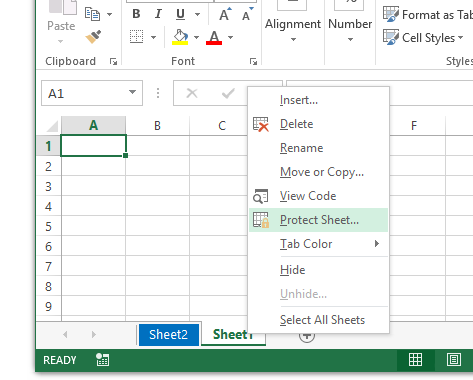
  • Right click on sheet tab
  • select Protect sheet, See Below
  • After click on it. a new popup box will appear having many options.
  • Check the option that you want to allow the user to perform, if you totally want to restrict whole sheet from editing even that selecting then UNCHECK all the option

  • Enter the password and click OK
  • Again Re-Enter the same password to confirm.
  • Done you Worksheet has been protected.
How to Unprotect the sheet
  • Right click on sheet tab that you have protected
  • Click on unprotect sheet
  • Enter the password and click OK
Yes you have removed protection from this sheet but remember that if you forget this password, Window will never retrieve it again, so be careful in this matter.


Read More »